Welcome! Today, we're going to take a look at how to set up and test an app using a Kubernetes cluster, with the help of Google Cloud Platform (GCP).
Step 1: Understand the Basics
Take a look at two important files:
We are using these files to tell Kubernetes how to run our app. We're asking it to make two copies of our app (two pods), and we're setting it up so the app is ready to get traffic from Port 8080.
Why are we using Load Balancer?
To make sure our app can be found and used online, we set up a Load Balancer Service. This service listens on Port 80 and sends any traffic it gets over to our app on Port 8080.
Step 2: Get it Running on Google Cloud Shell
Connect Google Cloud Shell
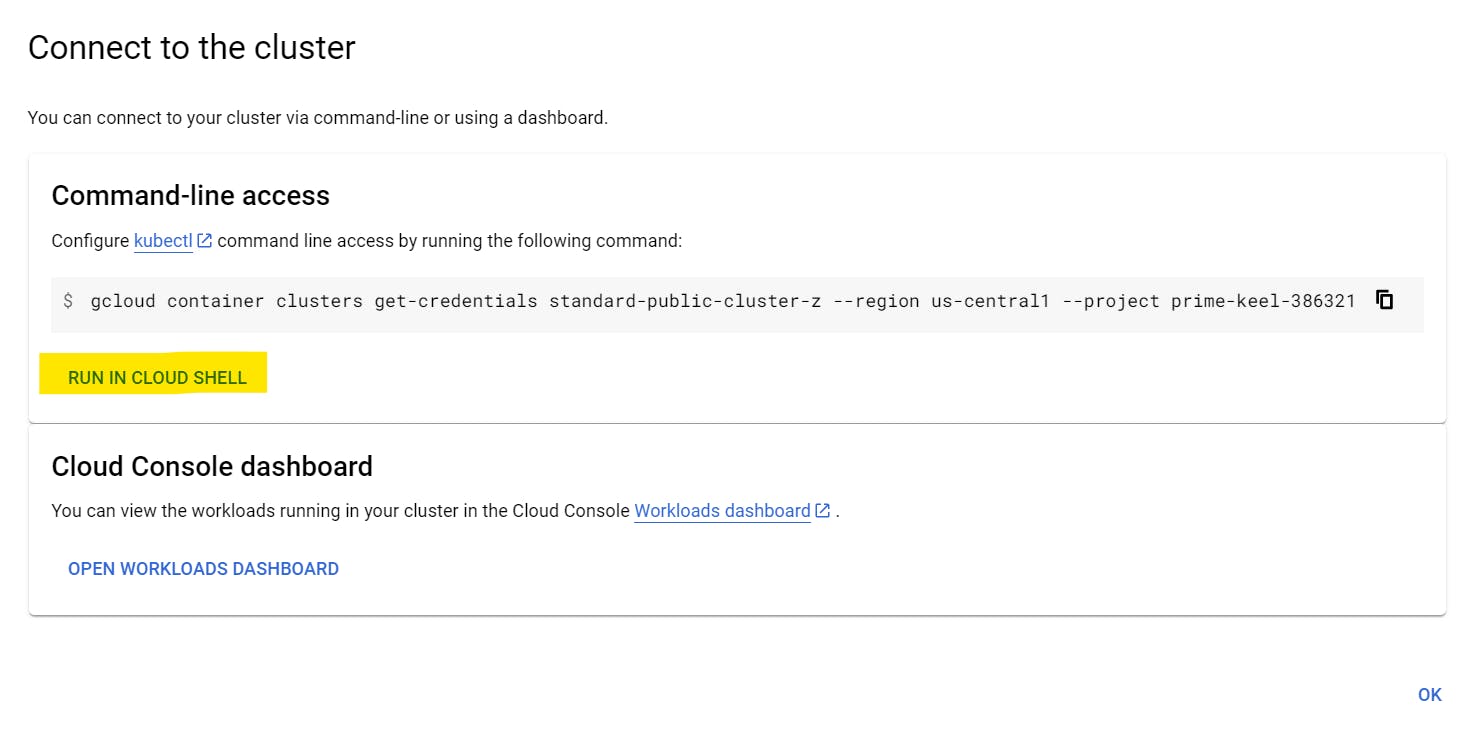
Navigate to your K8s Cluster and connect to the Cloud Shell.

Click "RUN IN CLOUD SHELL" to boot up the cloud shell service in Google Cloud console.

Once it is connected, you can press the options(3 dots) and upload the YAML files from your local system.


You can double-check by the `ls` command.

I have both my deployment and load balancer YAML files in kube-files folder.
Next, we go to the Cloud Shell terminal and use a command (kubectl apply -f file_name) to set our app up. In my case it's kube-files.

This gets our two pods going and starts up the Load Balancer Service.
We can double-check everything's working with a few simple commands:
kubectl get deployment: This makes sure our deployment worked.
kubectl get svcorkubectl get service: This checks that the service is set up.
kubectl get pod: This lets us see the pods we've created.
With all that done, you can now find your app online using the external IP from the Load Balancer Service.
Step 3: Take a Look at Your Work on the GKE Dashboard
The GKE Dashboard lets you see everything about your workloads and services. You can look at logs, see how many pods you've got, and lots more.

If you've done everything right, you should also see a load balancer in the network services section of your Google Cloud.
Step 4: Clean Up After Yourself
Once you've tested your app, it's important to clean up. That way, you don't get charged for things you're not using. Use the command kubectl delete -f file_name to remove the deployment and service.

Double-check everything's gone with kubectl get deployment, kubectl get svc, and kubectl get pod. If you've cleaned up properly, you shouldn't see any resources related to the deployment.
Also, check that the load balancer in Google Cloud's network services section has been deleted.
Conclusion
That's it! We've learned how to set up and test an app on a Kubernetes cluster and how to clean up after ourselves. In future posts, we'll explore more about managing and scaling apps and get to grips with more advanced parts of Kubernetes. Stay tuned!
The Fun Finale!
In the world of Kubernetes, there's always something new to learn and new challenges to conquer. So, embrace the journey, keep experimenting, and remember to have fun along the way!
Here's to many more GKE adventures! Until next time, happy Kubernet-ing!
Until then, why don't you drop by my GitHub? I go by zainuleb there and I keep it updated with all sorts of cool projects. And hey, while you're surfing the interwebs, feel free to connect with me on LinkedIn too. Let's talk tech, dreams, or the latest games.
Last but not least, for the day-to-day shenanigans you can find me on Instagram at @zainuleb. I promise my feed is more than tech stuff.
Until we meet again keep exploring, stay curious, and remember, in a world where you can be anything, be kind.
-Zain